Kuadrant Console (Connectivity Link plugin)
Estimated time: ~15 minutes · Strategy: Kuadrant Console (day-2)
Learning objectives
-
Open the Connectivity Link console plugin in OpenShift Console
-
Create / approve an API Key and reveal its Secret value
-
Use traffic / Grafana deep links for day-2 operations
Kuadrant Console is the day-2 operate strategy in this workshop’s set (with Developer Hub Golden Path, Migration Toolkit, and APIShift). It is an OpenShift Console dynamic plugin (custom-rhcl-console) that surfaces API Products, API Keys, traffic metrics, Grafana deep links, and Swagger UI.
Architecture
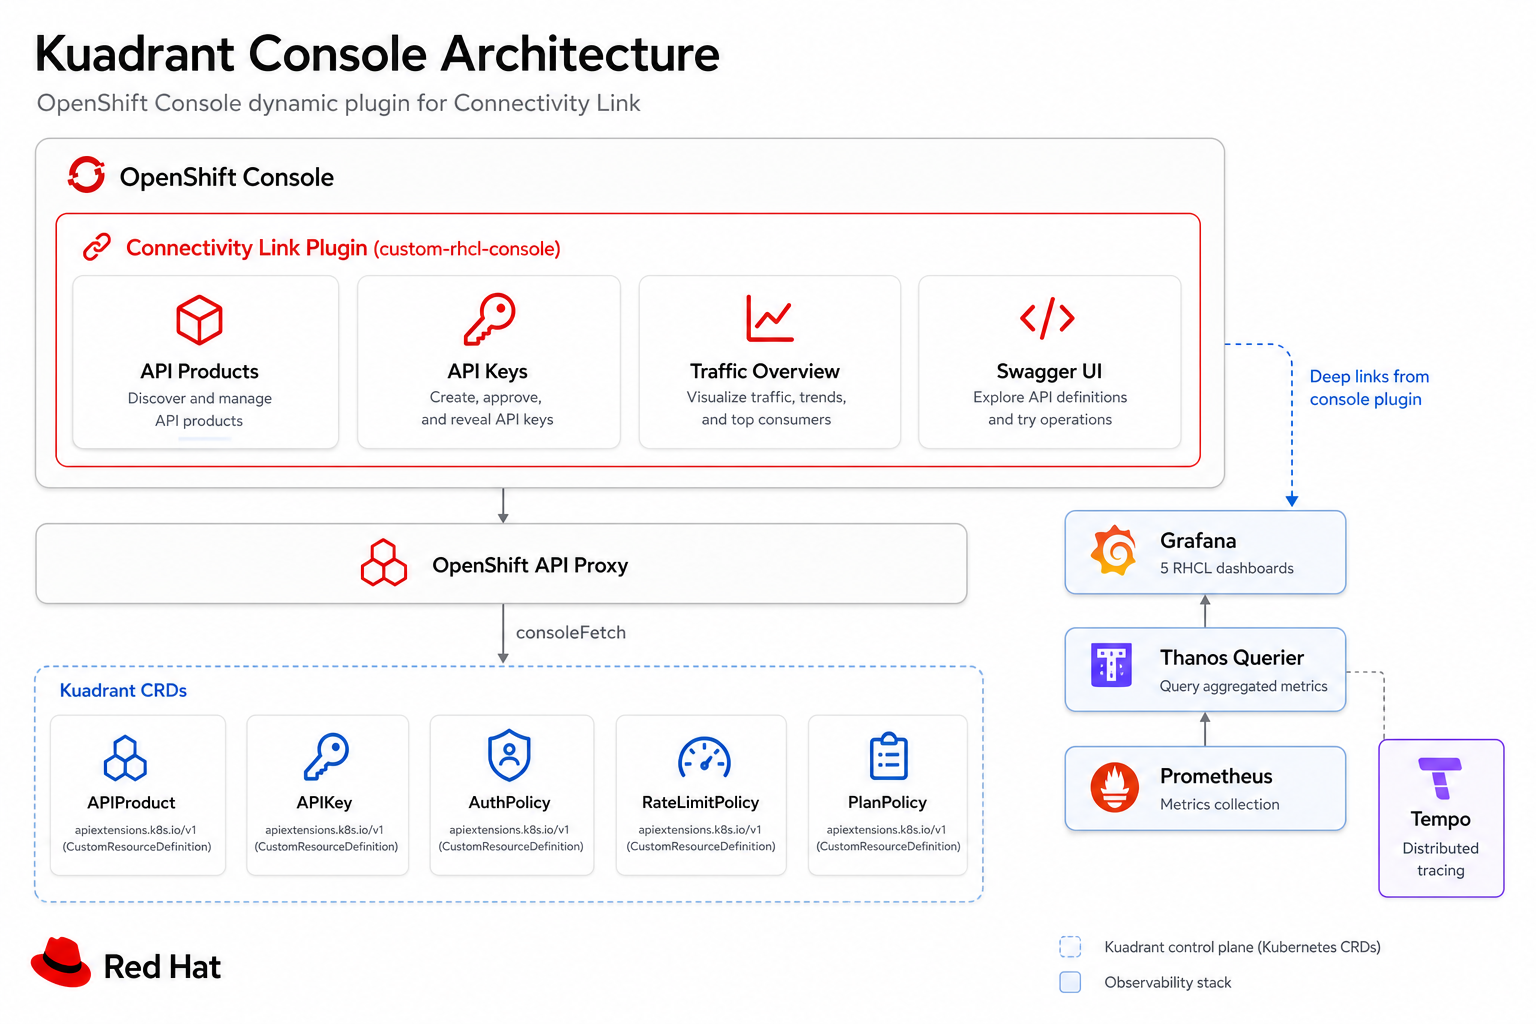
The plugin talks to the cluster through the Console API proxy (consoleFetch). It manages Kuadrant CRDs such as APIProduct, APIKey, AuthPolicy, RateLimitPolicy, and PlanPolicy, and deep-links into Grafana RHCL dashboards and Tempo traces.
Where to open it
-
Log in to the OpenShift Console (workshop platform user or cluster-admin).
-
In the left navigation, open Connectivity Link (plugin display name).
-
Explore:
-
API Products — inventory of products in
kuadrant-console-demoand other namespaces -
API Keys — create, approve/reject, reveal key material from Secrets
-
Traffic / cost — overview metrics backed by Thanos / Prometheus
-
If the plugin menu is missing, confirm the ConsolePlugin custom-rhcl-console is enabled and the plugin Deployment in namespace custom-rhcl-console is Ready.
|
Demo environment
This workshop pre-deploys kuadrant-console-demo with six mock APIs behind a shared Gateway (kuadrant-demo.<domain>):
-
inventory-service
-
payment-gateway
-
order-management
-
customer-loyalty
-
shipping-tracker
-
notification-hub
Each API has an HTTPRoute, AuthPolicy (API key via X-API-Key), RateLimitPolicy, PlanPolicy (free / basic / pro), and an APIProduct with OpenAPI docs.
Create and use an API key
-
Open API Keys → Create API Key.
-
Select product
kuadrant-console-demo/inventory-service, planfree(orprofor higher limits). -
Enter requester user id + email → Create.
-
If the product is not auto-approved, use Approve on the row (label-based phase used by the console).
-
Click Reveal Key, copy the value.
-
Open the product Definition / Swagger UI and call the gateway with
X-API-Key(orAuthorization: Bearer <key>— mapped by the demo EnvoyFilter).
Plan free is intentionally tight (for example ~10 req/min, ~100/day). Hitting 429 Too Many Requests means Limitador is working. Restart Limitador to flush counters in a demo: oc rollout restart deployment/limitador-limitador -n kuadrant-system.
|
Observability
The plugin deep-links into Grafana dashboards provisioned by the observability chart:
-
RHCL Traffic Overview
-
RHCL Consumer Dashboard
-
RHCL Cost & AI Dashboard
-
RHCL Authorino metrics
-
RHCL Limitador metrics
Mesh traffic is generated by mesh-traffic-generator so dashboards are populated on a fresh cluster.
Helm deployment
The plugin is installed as connectivityLink.helmApps entry custom-rhcl-console in examples/helm/values.yaml (namespace must remain custom-rhcl-console).
Next
Continue with Migration Toolkit or APIShift to migrate configuration from 3scale.